This is the same techniqe I use when I paint my regular art as well. I just don't have any lineart! Well, when it comes ot characters - landscapes is a different story!
BEFORE WE START...
I work on a mac, but you can do this on a pc as well. Keep in mind though, that command in macintosh means ctrl in pc.
I work in Photoshop CS, but any version above 7 should work pretty much the same
My version of photshop is in swedish, so some terms may not be correctly translated into english. If you know the proper term don't heistate to tell me so I can change anything that is wrong. Words marked with * means that I don't know what the correct translation is, so pay attention to the image!
(question? Ask in a comment and I'll do my best to answer!)
SHADING
Hey again folks! Time for part 3 of this tutorial set on how to go from just lines to colored lines! ^^
There are not a whole lot of instructions to give when it comes to painting, it's justs oemthing you know or you dont. You can practise and get better.
I used only ONE single brush for all the painting. It was a medium hard brush, with opacity at 70%. Since I have a preassure sensitive wacome tablet, I can effect the preassure as much as I like. Part of the secret is painting in light strokes, over and over again. A good example on what I mean is our fellow howlinghorse who's using the technique of light preassure and flow. Look at her gallery to get a sense of what I mean, her cg work almost looks like watercolor, very beautiful.
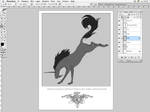 1. Here it is, all untouched. First thing we wanna do is 'lock' the layer. Cross the transperacy box while having your chosen layer active (the body this time). What this does is that the only place where the brush will work, is on areas allready painted. You can try it yourself - while marks appear on the grey, nothing will appear outside, where it's transperant!
The transperacy box is located around the top of the layer window - there are four boxes on a row and it's the first one you should check - like in the image!
 2. I will use only one brush for this painting. It is a hard-edged round brush. I soften it a bit, so the hardness is somewhere between 50% and 70%. Then I just pick a grey shade and start painting. I start with a fairly big brush and just start by laying in basic shape work. You can see how softly I'm painting, no hard contrasts here.
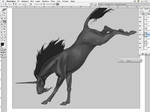 3. When I've blocked in some major shapes, I go with a slightly smaller brush to enhance some of the shapes further. I also pick a darker shade of grey and a slightly smaller brush again and go over some of the more important angles with it.
You can see the transperancy in my brushstrokes.
A side note - a lot of shading is about emphasizing SHAPE. If you always keep shape in mind, you're shading will become more natural - the belly is round, so your strokes should be round as well, and follow the contour of the shape. You have to think in 3D even though you are painting in 2D.
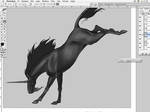 4. Now we go for a bigger brush again, but darker. Just swoosh it gently over the areas that need deepening. More enhancing. Also, started going into some smaller details - the legs, the face.
 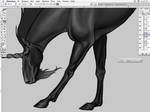 5. Just more details, with a darker shade. At this time I picked up a lighter shade and started veeery gently to pick up -some- highlight, like the nostril and the brow and cheekbone.
 6. I felt the line along the topline of the neck was disturbing, as it enhanced too much, so I removed most of it, and let the shading work for itself. Other than that it's just about going over the same things again. I start using the eyedropper to pick up shades as I go. It's all about blending!
If you have a mouse, you may need to lower the opacity even more to get good blending - rather paint many times and get smooth blending then few and get uneven.
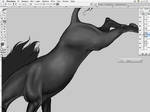 7. More blending! On this area I have to work with the big sweeping brushstrokes, gently and lightly to soften without loosing too much structure. The reason for using hardedged brushes is that you get a structure that is completely lost if you use the airbrush.
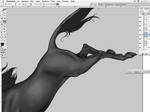 8. Softly getting a feel for details - like the base of the tail, little wrinkles at the hock, a crease by the backknee.
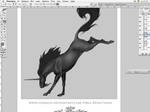 9. So, that's the base work all done. Time ot get into those highlights!
 10. So! Big brush! Soft little strokes! Big area!
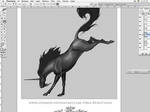 11. Smaller brush, slightly lighter shade. Start suggesting the shape of the body - remember that the glossy highlights is a reflection of light. Look around you, looks at yourself - where is the light reflected most brightly? There is a key to how shade and light work around shapes - the key to mastering it in drawing is understanding in real life.
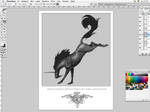 12. Smallest brush now! Lightest color! Paint gently, and let the thinnest stroke be the very top of the highlight!
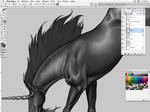 13. Next we move onto the mane! The following steps follow a very simple structure! You start with a big brush, follow the 'direction' hinted by the shape of the mane, and just draw! Smaller and smaller lines!
 It's good to remember that hair have a tendency to end up in 'chunks' or thick gatherings of strands, so think the hair into sections when you draw the hairs!
 14. Repeat with smaller brush.
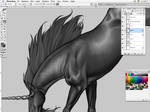 15. Repeat with even smaller brush. Just keep going until you are satisfied!
 16. This is it! Last thing to do is take out the Dodge tool, setting midtones. Bif soft brush, pull it gently over you 'chunks' and then once of twice along the direction of the neckline and you're done! Repeat everything with the tail! If it becomes too bright, you can take the Burn tool, also set to midtones, and gently enhance the 'chunks' by shading!
 That's all folks - next step is coloring this, and that will also be the final one! And probably the biggest one!!