Extracting Lineart
BEFORE WE START...
I work on a mac, but you can do this on a pc as well. Keep in mind though, that command in macintosh means ctrl in pc.
I work in Photoshop CS, but any version above 7 should work pretty much the same.
My version of photshop is in swedish, so some terms may not be correctly translated into english. If you know the proper term don't heistate to tell me so I can change anything that is wrong. Words marked with * means that I don't know what the correct translation is, so pay attention to the image!
 1.Here we have our lineart opened in photoshop.
In order for this to work as well as possible, the lineart needs to be a big high quality jpeg, as goes for all linework you want to color. So, if you pick one of poor qiuality, the result smay not come out very good. just a warning.
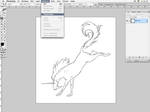 2. When you have your file ready in photoshop, go to SELECT in the top menu. Use colorarea*.
 3. You should get a box looking like this. Take the colorpicker and click anywhere. Use the maximum setting on the radience* (200).
  4. You should come out with a selection looking like this. A selection is a dashed moving line that surrounds a certain area. In the image, everything that is white is 'selected'.
 5. Invert the selection, so it only includes black. Do this by clicking command + shift + i, or go into SELECT again, and pick the command there.
Copy it (command + C).
 6. Paste into a new layer. Create another layer that you fill with white (or whatever color), and have it beneath your extracted lines. you can now delete the original image from the layers! You should have one white layer, and one with the lines and nothign else! 7. To make su rethere are no stray pixels of other color, I usually use command+u (if that command does not work, it's mean your image file is in grayscale and not rgb. Change this in IMAGE in the top menu) and pull the darkness in the window that comes up to a maximal black. This way, everything is black in the outline!
And we're done! Now you have extracted the lineart!
Remember, USE THIS POWER FOR GOOD, and not to steal and manipulate other peoples work!!