ShopDreamUp AI ArtDreamUp

Deviation Actions
![Base 37 [P2U] paypal POINTS](https://images-wixmp-ed30a86b8c4ca887773594c2.wixmp.com/f/744dcaaf-0b90-4a87-b5d7-a84c294d6321/defts8h-db74f647-00bc-48f8-b645-7ed1791e0ae6.png/v1/fill/w_354,h_350/base_37__p2u__paypal_points_by_pacificnoir_defts8h-350t.png?token=eyJ0eXAiOiJKV1QiLCJhbGciOiJIUzI1NiJ9.eyJzdWIiOiJ1cm46YXBwOjdlMGQxODg5ODIyNjQzNzNhNWYwZDQxNWVhMGQyNmUwIiwiaXNzIjoidXJuOmFwcDo3ZTBkMTg4OTgyMjY0MzczYTVmMGQ0MTVlYTBkMjZlMCIsIm9iaiI6W1t7ImhlaWdodCI6Ijw9MTU4MiIsInBhdGgiOiJcL2ZcLzc0NGRjYWFmLTBiOTAtNGE4Ny1iNWQ3LWE4NGMyOTRkNjMyMVwvZGVmdHM4aC1kYjc0ZjY0Ny0wMGJjLTQ4ZjgtYjY0NS03ZWQxNzkxZTBhZTYucG5nIiwid2lkdGgiOiI8PTE2MDAifV1dLCJhdWQiOlsidXJuOnNlcnZpY2U6aW1hZ2Uub3BlcmF0aW9ucyJdfQ.X-7rB50t21pjtcky8ouPW6wIVp0aq_GEb0ojdVcg46w)


Description
PART 2.
Now we color. I start with command+B, and get the following window as in image 5.
In this window we can add color. I usually work mainly with the Midtones, but sometimes also with highlights, but rarely with the shadows, as it destroys gradients and adds too much contrast. It can serve its purposes though, on occasion. It's all about trying your way forward.
So, now we have some basecolor. You'll notice the lighter areas? They look nice and soft colorwise, good thing we did that first huh? (Wink)")
Anywya, the color we have now is pretty static though, so this is where the trixi part start. Lasso tool again, remember to adjust the fuzzyness for each are you lasso. (Oh, and if you can't get more than one area at a time, you have the wrong setting on your lasso. There's needs to be a little + symbol. It's the second setting in the top bar!)
Get your Color Balance window open again (command+B), and give the tender areas a push of more color. Deselect with command+D.
Get the lasso again, and draw out some bigger areas to be darker. Get your curves open (command+M) and darken at will. I also desaturated it a bit with command+U.
Now I go back to selecting the tender areas with my lasso, and the invert the whole selection. I get my curves open again and darken the lot of it.
Time for more variations in hue. I pick out some small suitable spots (rememeber the fuzzyness, I probably had at least 30 at these areas). I add a new color, red and some magenta to get a deeper range of colors.
Now let's make him a bay. Big fuzzyness - i lasso th elegs and muzzle and ears, around the eye, and go to command+U, and desaurate (desaturate means draining of color) almost completely. I rarely desaturate alltogether, but keep some color left. It works more naturally that way.
I also decided to add come cyan and blue, both in midtones and highlights with command+B, to increase teh colordifference. Sometimes black seems more black if you give it a blue tint. Just be careful not to use too much! I find combining cyan and blue gives the best shade in my taste.
I want to give him more blue in his pelt - it will make him darker without making him to black, and will also effect the gradient hue where it touches the browns and yellows.
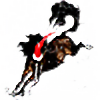
In this last image you'll see I have added mroe blue to his muzzle, made his honr black and his beard as well. I've also colored his mane - i did that by first making it bright blue with command+B, then I in stages, darkened it gradually with curves and darkened it with command+U. I also desaturated as I went, to make the hue a more descreet steely tint.
Now, you can go on with this forever - the glossy higlights for example, are not as glossy as they could be. You can get the Dodge-Highlight and gently brush over the highlights. You can also use the lasso and trace around the higlights with an appropriate setting of fuzzyness, and then brighten it and changing the hue slightly depending on what color the light is! The possibilities are endless!
Next I will teach you how to make markings and paints and dappling with my techniques! If you like, you can request colorschemes I can make examples of for the last part of this tutorial series! You can't to make a fleabit grey? I can do it. A red dun paint? I can do it. A chestnut roan? I can do it. Whatever you want, challenge me, and I'll show you how it's done!")
Now we color. I start with command+B, and get the following window as in image 5.
In this window we can add color. I usually work mainly with the Midtones, but sometimes also with highlights, but rarely with the shadows, as it destroys gradients and adds too much contrast. It can serve its purposes though, on occasion. It's all about trying your way forward.
So, now we have some basecolor. You'll notice the lighter areas? They look nice and soft colorwise, good thing we did that first huh?
Anywya, the color we have now is pretty static though, so this is where the trixi part start. Lasso tool again, remember to adjust the fuzzyness for each are you lasso. (Oh, and if you can't get more than one area at a time, you have the wrong setting on your lasso. There's needs to be a little + symbol. It's the second setting in the top bar!)
Get your Color Balance window open again (command+B), and give the tender areas a push of more color. Deselect with command+D.
Get the lasso again, and draw out some bigger areas to be darker. Get your curves open (command+M) and darken at will. I also desaturated it a bit with command+U.
Now I go back to selecting the tender areas with my lasso, and the invert the whole selection. I get my curves open again and darken the lot of it.
Time for more variations in hue. I pick out some small suitable spots (rememeber the fuzzyness, I probably had at least 30 at these areas). I add a new color, red and some magenta to get a deeper range of colors.
Now let's make him a bay. Big fuzzyness - i lasso th elegs and muzzle and ears, around the eye, and go to command+U, and desaurate (desaturate means draining of color) almost completely. I rarely desaturate alltogether, but keep some color left. It works more naturally that way.
I also decided to add come cyan and blue, both in midtones and highlights with command+B, to increase teh colordifference. Sometimes black seems more black if you give it a blue tint. Just be careful not to use too much! I find combining cyan and blue gives the best shade in my taste.
I want to give him more blue in his pelt - it will make him darker without making him to black, and will also effect the gradient hue where it touches the browns and yellows.
In this last image you'll see I have added mroe blue to his muzzle, made his honr black and his beard as well. I've also colored his mane - i did that by first making it bright blue with command+B, then I in stages, darkened it gradually with curves and darkened it with command+U. I also desaturated as I went, to make the hue a more descreet steely tint.
Now, you can go on with this forever - the glossy higlights for example, are not as glossy as they could be. You can get the Dodge-Highlight and gently brush over the highlights. You can also use the lasso and trace around the higlights with an appropriate setting of fuzzyness, and then brighten it and changing the hue slightly depending on what color the light is! The possibilities are endless!
Next I will teach you how to make markings and paints and dappling with my techniques! If you like, you can request colorschemes I can make examples of for the last part of this tutorial series! You can't to make a fleabit grey? I can do it. A red dun paint? I can do it. A chestnut roan? I can do it. Whatever you want, challenge me, and I'll show you how it's done!
Image size
1280x960px 334.26 KB
© 2007 - 2024 Losmios
Comments1
Join the community to add your comment. Already a deviant? Log In
That tutorial is so great!!! I will try to do my next picture with your technique! And I would LOVE to see how you do markings, paints and dappling!!! Oh please....could you make a tutorial of it? 